作为一个把Hexo、NexT官网的文档看了一个遍的人,我想我可以写一篇文章总结一下。
名词解释
| 名词 | 说明 | 网址 |
|---|---|---|
| hexo | Hexo 是一个快速、简洁且高效的博客框架。Hexo 使用 Markdown(或其他标记语言)解析文章,在几秒内,即可利用靓丽的主题生成静态网页。 | https://hexo.io/zh-cn/docs/ |
| Next | NexT是Hexo的高品质优雅主题 | https://theme-next.js.org/ |
| vercel | Vercel 是一个面向开发人员的平台,它提供了更快地构建和部署 Web 应用程序所需的工具、工作流和基础架构,而无需进行其他配置。Vercel 开箱即用地支持流行的前端框架,其可扩展的安全基础架构遍布全球,可从用户附近的数据中心提供内容,以实现最佳速度。 | https://vercel.com/ |
| github pages | github官方的,直接用github仓库生成静态网站。但是速度比较慢,建议使用支持cdn的托管平台,例如vercel | https://pages.github.com/ |
| github actions | 亦称为workflows。工作流是将运行一个或多个作业的可配置自动化过程。工作流由签入到存储库的 YAML 文件定义,并在存储库中的事件触发时运行,也可以手动触发或按定义的计划触发。工作流在存储库的 .github/workflows 目录中定义,一个存储库可以有多个工作流,每个工作流可以执行一组不同的任务。例如,您可以有一个工作流来构建和测试拉取请求,另一个工作流在每次创建发布时部署应用程序,还有另一个工作流在每次有人打开新问题时添加标签。 | https://docs.github.com/en/actions/using-workflows/about-workflows |
安装并使用hexo
首先安装nodejs
安装 Hexo
所有必备的应用程序安装完成后,即可使用 npm 安装 Hexo。
npm install -g hexo-cli安装 Hexo 完成后,请执行下列命令,Hexo 将会在指定文件夹中新建所需要的文件。
hexo init <folder>
cd <folder>
npm install
新建完成后,指定文件夹的目录如下:.
.
├── _config.yml
├── package.json
├── scaffolds
├── source
|   ├── _drafts
|   └── _posts
└── themes
_config.yml
网站的 配置 信息,您可以在此配置大部分的参数。
source
资源文件夹是存放用户资源的地方。除 _posts 文件夹之外,开头命名为 _ (下划线)的文件 / 文件夹和隐藏的文件将会被忽略。Markdown 和 HTML 文件会被解析并放到 public 文件夹,而其他文件会被拷贝过去。
themes
主题 文件夹。Hexo 会根据主题来生成静态页面。
写文章
hexo new "My New Post"exo new会在source/_posts文件夹中创建一个名为My-New-Post.md的新文件,—和—之间是meta元信息,有标题、创建时间、标签等。在其后使用markdown语法写文章。
更多信息介绍: Writing
运行hexo
hexo generate
hexo server
hexo generate会通过源码生成静态Html文件,hexo server会在本地开启服务器,默认url是http://localhost:4000/.
也可以简写为:
hexo g
hexo s
安装NexT主题
打开终端,切换到 Hexo 站点根目录并安装 NexT 主题
cd hexo-site
npm install hexo-theme-next
启用NexT主题配置文件
NexT官方教程中给出的2个方式都不是太好,有缺陷。官方教程是修改themes/next/_config.yml或者node_modules/hexo-theme-next/_config.yml,这种方式不利于将来升级NexT,最新的最佳实践是创建_config.next.yml文件,和_config.yml同级。这一点可以查看[hexo的官方文档](Configuration | Hexo), 从Hexo 5.0.0版本开始支持。
创建完_config.next.yml文件后,把_config.yml中theme值改为next即可启用
# Extensions
## Plugins: https://hexo.io/plugins/
## Themes: https://hexo.io/themes/
theme: next
Next主题重要配置
scheme 建议使用Gemini,NexT官方网站就是使用的Gemini
#scheme: Muse
#scheme: Mist
#scheme: Pisces
scheme: Gemini
开启搜索
安装[搜索插件](GitHub – next-theme/hexo-generator-searchdb: 🔍 Seach data generator plugin for Hexo.)
npm install hexo-generator-searchdbHexo config file _config.yml
search:
 path: search.xml
 field: post
 content: true
 format: html
NexT config file _config.next.yml
# Local search
# Dependencies: https://github.com/next-theme/hexo-generator-searchdb
local_search:
  enable: true
  # If auto, trigger search by changing input.
  # If manual, trigger search by pressing enter key or search button.
  trigger: auto
  # Show top n results per article, show all results by setting to -1
  top_n_per_article: 1
  # Unescape html strings to the readable one.
  unescape: false
  # Preload the search data when the page loads.
  preload: false
开启评论
hexo支持很多评论系统,例如disqus、disqusjs、changyan、livere、gitalk、utterances、isso等,我基本上都测试了一遍。changyan是国产的,有一些特色功能,例如支持评论先审后发;gittalk、utterances等是基于github issues的;giscus是基于github discussions的,支持楼中楼。
| 名称 | 说明 | 官网 | 评价 |
|---|---|---|---|
| disqus | Disqus 是一种美国博客评论托管服务,适用于使用网络平台的网站和在线社区。 | https://disqus.com | 官网不开代理打不开 |
| disqusjs | 基于Disqus,DisqusJS 提供一个纯前端的、不依赖后端服务器的 Disqus 评论基础模式。 | https://disqusjs.skk.moe/ | 同上,不能用 |
| changyan | 畅言云评,国内的 | https://changyan.kuaizhan.com | 可以用,支持先审后发。但是评论需要登录到畅言云评账号 |
| gitalk | 基于github issues | https://gitalk.github.io/ | 不推荐,需要的权限太高,配置也太复杂,我搞了一天也没有完全成功。作者也很久不维护了。评论时需要登录github |
| utterances | 基于github issues,gitalk的完全替代者。 | https://utteranc.es/ | 推荐,可以只给评论的存储仓库开权限,几分钟就成功了,配置简单。评论时需要登录github |
| giscus | 基于github discussions,本项目深受 utterances 的启发。 | https://giscus.app/zh-CN | 推荐,和utterances很像,没有授权问题,配置简单。基于discussions,支持楼中楼,评论时需要登录github。本博客使用的是giscus评论系统。 |
| valine | 基于LeanCloud | https://valine.js.org/ | 推荐,无需登录,支持匿名评论 |
如果要使用giscus,需要先在源代码项目安装[hexo giscus插件](GitHub – next-theme/hexo-next-giscus: Giscus comment system for NexT) :
npm install hexo-next-giscus其次创建一个自己名下用来存储的公开仓库,然后打开giscus 填写相关信息,即可自动生成giscus配置。
giscus:
  enable: true
  repo:  #需要修改成自己的公开仓库
  repo_id: 需要修改成自己的
  category: General
  category_id: 需要修改成自己的
  # Available values: pathname | url | title | og:title
  mapping: pathname
  # Available values: 0 | 1
  reactions_enabled: 1
  # Available values: 0 | 1
  emit_metadata: 1
  # Available values: light | dark | dark_high_contrast | transparent_dark | preferred-color-scheme
  theme: preferred_color_scheme
  # Available values: en | zh-CN
  lang: en
  # Place the comment box above the comments
  input_position: top
  # Load the comments lazily
loading: lazy其他的设置都比较简单,可以自行参考NexT官方文档。
开启文章底部分享
_config.next.yml
addtoany:
  enable: true
  buttons:
    - facebook
    - twitter
    - telegram
    - wechat
    - qzone
    - sina_weibo
开启文章字数计数
安装
npm install hexo-word-counter_config.next.yml配置
# Post wordcount display settings
# Dependencies: https://github.com/next-theme/hexo-word-counter
symbols_count_time:
  separated_meta: true
  item_text_total: true
标签词云

标签词云的github地址为hexo-tag-cloud
安装
npm install hexo-tag-cloud_config.next.yml配置
# hexo-tag-cloud
tag_cloud:
  textFont: Trebuchet MS, Helvetica
  textColor: '#333'
  textHeight: 25
  outlineColor: '#E2E1D1'
  maxSpeed: 0.1
NexT其他插件
其他还有数学公式支持、基于LeanCloud的网站访客统计等功能,可参考官方教程
https://theme-next.js.org/plugins
https://theme-next.js.org/docs/third-party-services/
部署流程
npm install -g hexo-cli 再hexo init之后,会生成一个nodejs项目,hexo new会在source 文件夹中生成新的markdown文件。这个项目有_config.yml、package.json、.gitignore等文件,可以把这个项目称之为“源代码”项目。源代码项目是私有的。
然后生成的html静态网站,应该搞一个单独的html项目,例如项目名叫chunqiujinjing.github.io。
hexo new 新文章编辑好之后,就可以把“源代码”项目commit+push到git上面了。最后运行一下hexo g + hexo d可以部署到html项目中。
其实html项目也可以是私有的,只不过想使用github pages必须命名为chunqiujinjing.github.io并且公有才行。其实就算随便取名字,设置为私有,也可以自己部署到任意地方。
如果想做到commit+push源代码之后自动部署html项目,可以使用github actions。
github actions
在[hexo的github-pages文档](GitHub Pages | Hexo) 中有一个github actions的示例,但是其中配置的做法并不科学。它把源代码项目和html项目放到了一个仓库中,用不同的分支来区分,然后还部署到了github pages,github pages必须使用公开仓库。这就导致了网站的源代码和html代码都暴露了,你的所有配置将被一览无余:例如leancloud的appkey、giscus的id等等。
最佳实践是源代码仓库设置为私有,通过hexo deploy(或者由github action自动化)部署到html仓库。html仓库如果使用github pages部署,必须设置为公开,但通过vercel或者其他托管网站部署则可以设置为私有。
最佳实践
1 修改源代码仓库:
_config.yml
# Deployment
## Docs: https://hexo.io/docs/one-command-deployment
deploy:
  type: git
  repo: [email protected]:你的用户名/你的html仓库
  branch: main
2 添加github actions
可以参考hexo-action 来设置。
2.1 设置 Deploy keys 和 Secrets
2.1.1 运行ssh-keygen -t rsa -C "[email protected]" (替换为你的邮箱) ,会生成一个文件,里面有公钥和私钥。
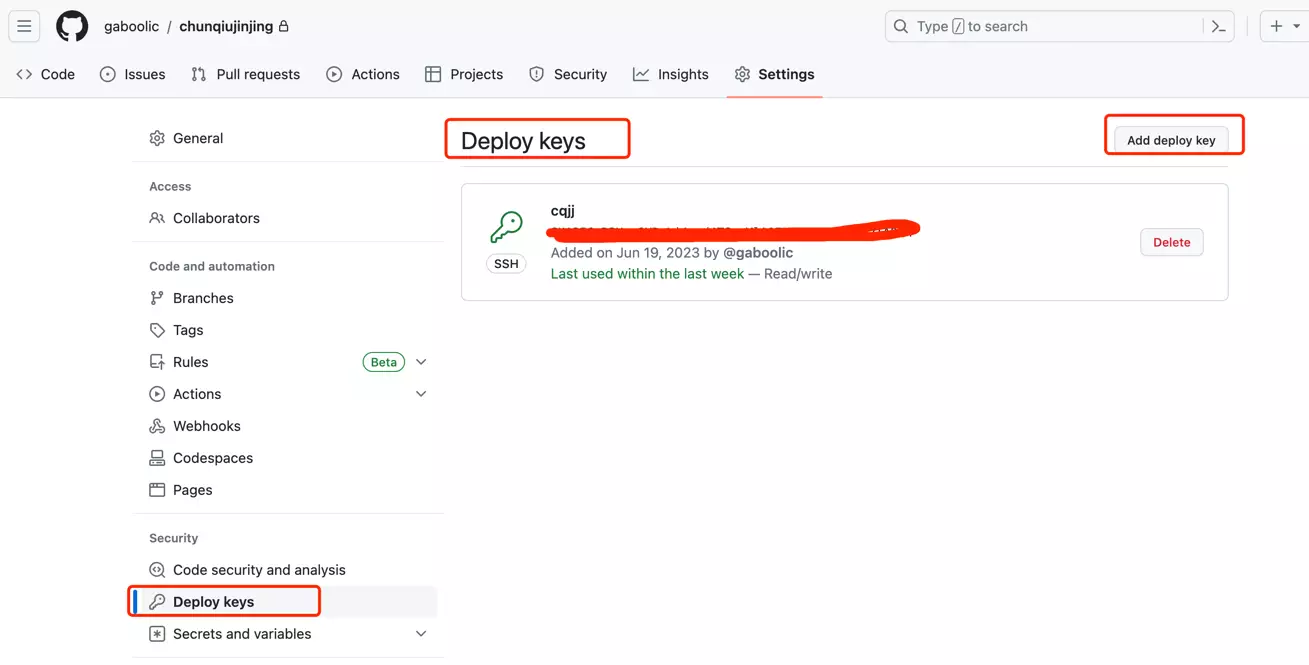
2.1.2 在 Github html存储库中:在 Settings > Deploy Keys 添加公钥。
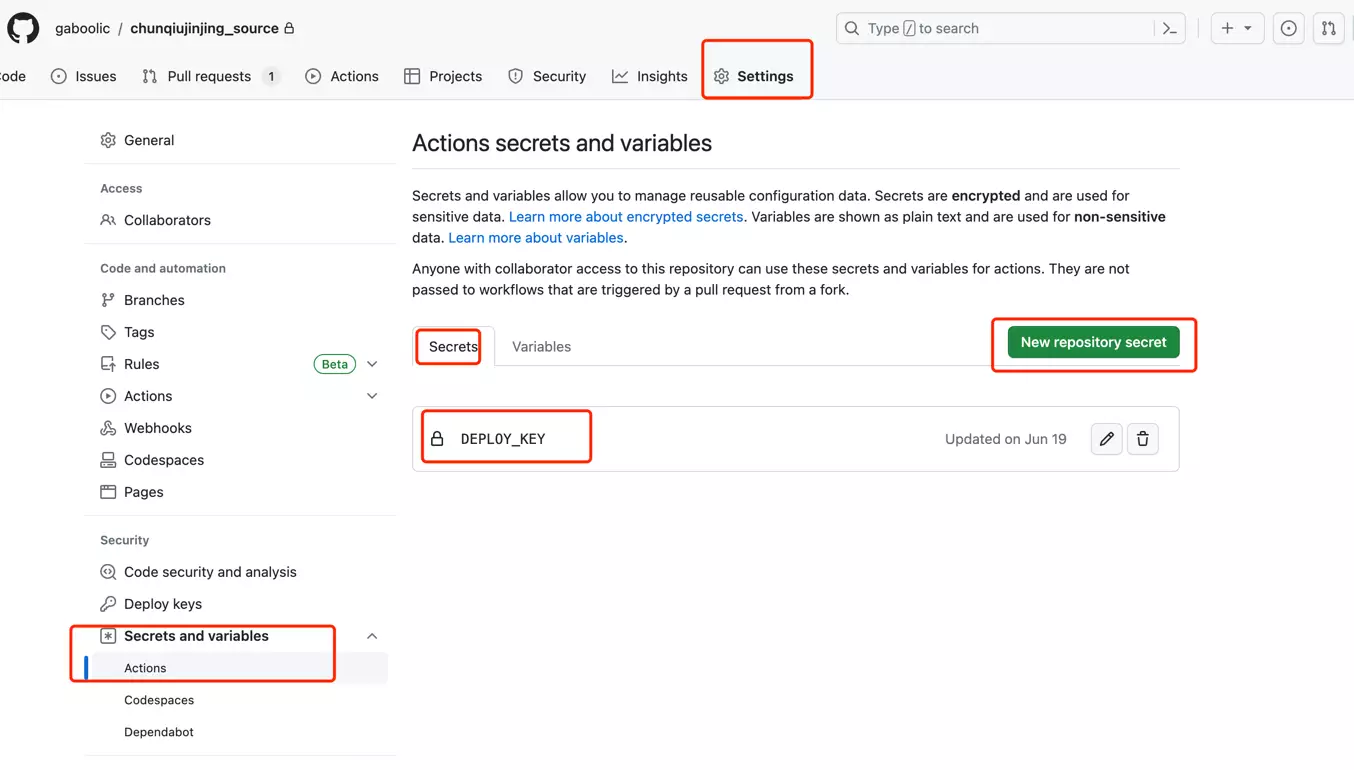
2.1.3 在 hexo 源代码存储库中:在 Settings > Secrets 菜单中添加私钥。


2.2 创建github/workflows/deploy.yml 文件,
name: Deploy

on: [push]

jobs:
  build:
    runs-on: ubuntu-latest
    name: A job to deploy blog.
    steps:
    - name: Checkout
      uses: actions/checkout@v1
      with:
        submodules: true # Checkout private submodules(themes or something else).

    # Caching dependencies to speed up workflows. (GitHub will remove any cache entries that have not been accessed in over 7 days.)
    - name: Cache node modules
      uses: actions/cache@v1
      id: cache
      with:
        path: node_modules
        key: ${{ runner.os }}-node-${{ hashFiles('**/package-lock.json') }}
        restore-keys: |
          ${{ runner.os }}-node-
    - name: Install Dependencies
      if: steps.cache.outputs.cache-hit != 'true'
      run: npm ci

    # Deploy hexo blog website.
    - name: Deploy
      id: deploy
      uses: sma11black/hexo-action@v1.0.3
      with:
        deploy_key: ${{ secrets.DEPLOY_KEY }}
#        user_name: your github username  # (or delete this input setting to use bot account)
#        user_email: your github useremail  # (or delete this input setting to use bot account)
        commit_msg: ${{ github.event.head_commit.message }}  # (or delete this input setting to use hexo default settings)
    # Use the output from the `deploy` step(use for test action)
    - name: Get the output
      run: |
        echo "${{ steps.deploy.outputs.notify }}"
这样设置完之后,在hexo源代码仓库,创建或者修改完文章,只需要git commit、git push,就会自动触发github actions,完成部署代码到html仓库。
当然也可以不设置github actions,就需要自己手动hexo generate hexo deploy了。
部署到vercel
打开vercel官网,注册并登录,关联github账号,新建项目,选择html项目(注意不是源码项目)即可一键部署到vercel。
绑定域名
vercel分配的域名在大部分地区是被阻断的,可以绑定自己的域名。操作方法可以参考:GitHub – gaboolic/vercel-reverse-proxy


